How to Check a Used iPhone Before Buying: The Complete 15-Point Scam-Proof Checklist (2026 Guide)
Buying a used iPhone can save you hundreds of dollars. However, it can also become an expensive mistake if you do not know what to check before handing over your money.
Every year, thousands of buyers unknowingly purchase iPhones with hidden problems. Some devices have poor battery health. Others contain non-genuine parts. In more serious cases, buyers discover their new phone is iCloud-locked, blacklisted, or even stolen.
The good news is that most of these problems can be identified within a few minutes if you know where to look.
Whether you are buying from Facebook Marketplace, a local seller, a phone shop, or a classified website, this guide will show you exactly how to inspect a used iPhone before making a purchase.
By the end of this article, you will know how to verify authenticity, test hardware, check battery health, confirm ownership status, and avoid the most common scams.
Why Checking a Used iPhone Is Essential
Many buyers make the mistake of focusing only on appearance.
A clean-looking iPhone is not always a good iPhone.
Some problems are hidden inside the software or hardware and may not become obvious until after the purchase.
Common issues found in used iPhones include:
- Activation Lock enabled
- Blacklisted IMEI numbers
- Weak batteries
- Replaced screens
- Faulty Face ID
- Network restrictions
- Water damage
- Counterfeit parts
A thorough inspection can protect your money and prevent future headaches.
Step 1: Inspect the Physical Condition
The first thing you should do is examine the iPhone carefully.
Physical damage often reveals how well the device has been treated.
Check the Display
Inspect the screen under good lighting.
Look for:
- Cracks
- Deep scratches
- Dead pixels
- Discoloration
- Bright spots
- Screen lifting
Open several apps and view white backgrounds to spot display defects.
If possible, increase brightness to maximum.
Inspect the Frame
Carefully check all edges.
Look for:
- Dents
- Bends
- Impact marks
- Paint damage
A bent frame may indicate a serious drop.
Examine the Back Glass
Modern iPhones use glass backs.
Check for:
- Cracks
- Repairs
- Uneven surfaces
Even a small crack can reduce resale value.
Inspect the Camera Lenses
Camera lenses should be:
- Clear
- Scratch-free
- Dust-free
Damaged lenses often affect image quality.
Quick Buyer Tip
Minor cosmetic wear is normal.
Avoid devices with severe structural damage, bent frames, or evidence of poor repairs.
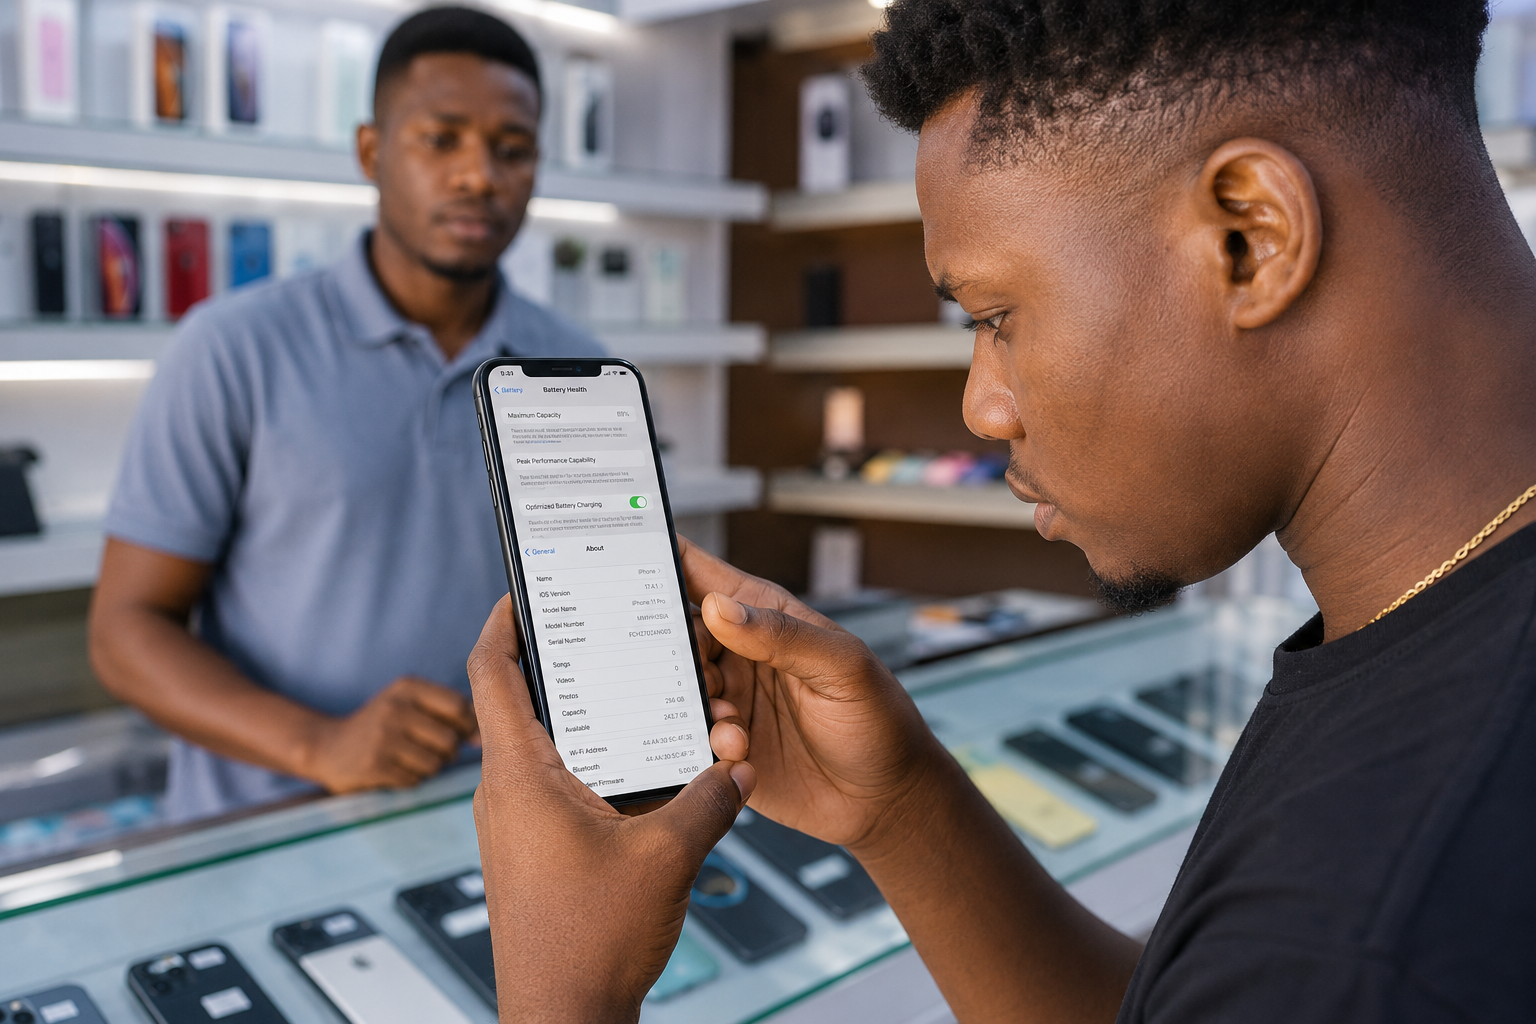
Step 2: Verify the IMEI and Serial Number
One of the most important checks involves the device’s IMEI number.
The IMEI acts like the phone’s fingerprint.
How to Find the IMEI
Go to:
Settings → General → About
Scroll down until you see:
- IMEI
- Serial Number
You can also dial:
*#06#
The displayed IMEI should match:
- The SIM tray (on supported models)
- Original packaging (if available)
- Device information
Why IMEI Verification Matters
The IMEI can reveal whether a device is:
- Reported lost
- Reported stolen
- Blacklisted
- Legitimate
If the seller refuses to provide the IMEI, consider that a major warning sign.
Red Flag
Never purchase an iPhone with a mismatched IMEI number.
Step 3: Confirm the iPhone Is Genuine
Counterfeit iPhones have become increasingly sophisticated.
Some fake devices look almost identical to real iPhones.
Check iOS Authenticity
Open:
Settings → General → About
A genuine iPhone should display:
- Model Name
- Model Number
- iOS Version
- Serial Number
Fake devices often run modified Android software disguised as iOS.
Open the App Store
A genuine iPhone uses Apple’s App Store.
If you see:
- Google Play Store
- Unknown app stores
The device is almost certainly fake.
Check Software Updates
Navigate to:
Settings → General → Software Update
A genuine iPhone should connect to Apple’s update servers.
Examine Build Quality
Apple devices typically have:
- Precise button placement
- Premium materials
- Consistent spacing
- Smooth software animations
Poor build quality often indicates a counterfeit product.
Step 4: Check Activation Lock and Find My iPhone
This step is absolutely critical.
An iPhone with Activation Lock enabled may become unusable after a reset.
Check Find My Status
Open:
Settings
Tap the owner’s Apple ID profile at the top.
Select:
Find My
Then verify:
Find My iPhone = OFF
Seller Must Sign Out
Before payment, ask the seller to:
- Sign out of iCloud
- Disable Find My
- Remove the device from their Apple account
Factory Reset Verification
A legitimate seller should be comfortable resetting the device.
After reset, the phone should proceed directly to setup.
If it asks for someone else’s Apple ID credentials, walk away immediately.
Major Warning
Never trust promises such as:
“I’ll remove the account later.”
If Activation Lock remains enabled, do not buy the phone.
Step 5: Review Battery Health
Battery condition significantly affects the user experience.
A cheap iPhone with a worn-out battery may require an expensive replacement.
How to Check Battery Health
Go to:
Settings → Battery → Battery Health & Charging
Look for:
Maximum Capacity
What Battery Percentages Mean
| Battery Health | Recommendation |
|---|---|
| 95%–100% | Excellent |
| 90%–94% | Very Good |
| 85%–89% | Acceptable |
| 80%–84% | Consider Negotiating |
| Below 80% | Expect Replacement Soon |
Check for Battery Warnings
Pay attention to messages such as:
- Service Recommended
- Unable to Verify Genuine Battery
- Important Battery Message
These warnings may indicate repairs or battery issues.
Real-World Example
Imagine two iPhone 14 devices selling for the same price.
One has 97% battery health.
The other has 78%.
The first device will likely provide significantly better performance and longer battery life.
Buyer Tip
For most buyers, battery health above 85% is a good target.
Anything below 80% should influence your purchasing decision and price negotiation.
Step 6: Verify Genuine Apple Parts
Many used iPhones have undergone repairs. While repairs are not necessarily a problem, non-genuine parts can affect performance, reliability, and resale value.
Fortunately, newer iPhones make it easier to identify replacement components.
Check Parts and Service History
Go to:
Settings → General → About
On supported iPhone models, you may see a section called:
Parts and Service History
This section can indicate whether the following components have been replaced:
- Battery
- Display
- Camera
What the Messages Mean
| Message | Meaning |
|---|---|
| Genuine Apple Part | Original or properly verified component |
| Unknown Part | Unable to verify authenticity |
| No Message | No detected replacement history |
Why This Matters
Non-genuine parts may lead to:
- Reduced battery performance
- Display issues
- Face ID problems
- Lower resale value
If a replacement part is present, ask the seller for repair receipts.
Step 7: Test Face ID or Touch ID
Biometric authentication is one of the most expensive features to repair.
If Face ID or Touch ID is not working, fixing it can be difficult and costly.
Testing Face ID
Go to:
Settings → Face ID & Passcode
Select:
Set Up Face ID
Follow the setup instructions.
A properly functioning Face ID system should complete the process without errors.
Testing Touch ID
For older iPhones:
- Go to Settings.
- Open Touch ID & Passcode.
- Register a fingerprint.
- Lock and unlock the phone.
Warning Signs
Avoid devices that display messages such as:
- Face ID Not Available
- Unable to Activate Face ID
- Touch ID Failure
These issues often indicate hardware damage.
Step 8: Test Cameras and Flash
Many buyers focus on screen condition while forgetting to test the cameras.
Always inspect every camera before purchasing.
Test the Rear Cameras
Open the Camera app.
Check:
- Main camera
- Ultra-wide camera (if available)
- Telephoto camera (if available)
Look for:
- Blurry images
- Focus issues
- Black spots
- Flickering
Test the Front Camera
Switch to selfie mode.
Verify:
- Image clarity
- Proper focus
- Portrait mode functionality
Test Video Recording
Record a short video.
Check:
- Video quality
- Audio recording
- Stabilization
Test the Flash
Take several photos using the flash.
The flash should activate instantly and consistently.
Step 9: Test Speakers and Microphones
Poor audio quality often indicates hidden hardware issues.
Speaker Test
Play a video at maximum volume.
Listen for:
- Distortion
- Crackling
- Volume fluctuations
Microphone Test
Open Voice Memos.
Record a short message.
Play it back.
The recording should sound clear without static or interruptions.
Test Speakerphone Calls
If possible, make a call.
Verify:
- Earpiece speaker
- Loudspeaker
- Microphone
All should function normally.
Step 10: Inspect the Charging Port
A faulty charging port can quickly become frustrating.
Check Physical Condition
Inspect the charging port carefully.
Look for:
- Dirt buildup
- Corrosion
- Bent pins
- Physical damage
Test Charging
Connect a charging cable.
Confirm:
- Charging starts immediately
- Connection remains stable
- No charging interruptions occur
Test Data Transfer (Optional)
If possible, connect the device to a computer.
The phone should be detected normally.
Step 11: Test Wi-Fi, Bluetooth, and Cellular Connectivity
Connectivity problems can be difficult and expensive to diagnose.
Wi-Fi Test
Connect to a wireless network.
Verify:
- Stable connection
- Fast loading speeds
- No unexpected disconnects
Bluetooth Test
Pair the iPhone with:
- Earbuds
- Smartwatch
- Speaker
Ensure pairing works smoothly.
Cellular Network Test
Insert a SIM card.
Verify:
- Signal reception
- Mobile data
- Calling capability
- SMS functionality
Weak or inconsistent signal performance may indicate hardware issues.
Step 12: Check Carrier Lock and eSIM Status
Many buyers overlook carrier restrictions.
A carrier-locked device may not work with your preferred network.
Check Carrier Lock Status
Go to:
Settings → General → About
Scroll to:
Carrier Lock
What You Want to See
No SIM Restrictions
This indicates the device is unlocked.
Warning Signs
Avoid surprises by confirming compatibility before purchase.
Especially if:
- You travel frequently
- You plan to change carriers
- You use multiple networks
Check eSIM Support
For newer models, verify:
- eSIM functionality
- Network compatibility
This is increasingly important in many countries.
Step 13: Verify Warranty and Repair History
Warranty coverage can add value and peace of mind.
Check Coverage Information
Go to:
Settings → General → About → Coverage
You may see:
- Limited Warranty
- AppleCare coverage
- Expiration dates
Why It Matters
Active coverage can reduce future repair costs.
Ask the seller whether:
- The phone has been repaired
- Water damage has occurred
- Any components have been replaced
Honest sellers are usually transparent about repair history.
Step 14: How to Spot a Fake iPhone
Counterfeit devices continue to improve, making careful inspection essential.
Common Signs of a Fake iPhone
Poor Software Experience
Watch for:
- Laggy animations
- Incorrect menus
- Strange settings layouts
Missing Apple Features
Fake devices often lack:
- Face ID
- Apple services
- Genuine App Store access
Incorrect Specifications
Compare:
- Storage capacity
- Model number
- Hardware features
with Apple’s official specifications.
Suspicious Pricing
If a deal seems too good to be true, it often is.
A heavily discounted device deserves extra scrutiny.
Quick Fake iPhone Checklist
✔ App Store works correctly
✔ Software updates function normally
✔ Face ID or Touch ID operates properly
✔ Serial number appears legitimate
✔ Build quality feels premium
✔ Model specifications match seller claims
Step 15: Common Used iPhone Scams and How to Avoid Them
Understanding common scams can save you money.
Scam #1: Activation Lock Scam
The seller claims they will remove their account later.
Solution:
Never pay until Activation Lock is disabled.
Scam #2: Fake iPhone Scam
The phone looks genuine but runs modified Android software.
Solution:
Verify software, settings, and App Store functionality.
Scam #3: Blacklisted Device Scam
The phone was reported lost or stolen.
Solution:
Always verify the IMEI before purchasing.
Scam #4: Battery Health Manipulation
Some sellers replace batteries with low-quality components.
Solution:
Check Battery Health and Parts History.
Scam #5: Marketplace Meeting Scam
The seller pressures you to buy quickly.
Solution:
Take your time and complete every test.
Never allow yourself to be rushed.
Safety Tips for Facebook Marketplace and Local Deals
If you are buying from an individual seller:
Meet in a Public Location
Good options include:
- Shopping centers
- Coffee shops
- Mobile phone stores
- Police-designated safe exchange locations
Avoid Advance Payments
Never send deposits to unknown sellers.
Test Before Paying
Complete your inspection before handing over cash.
Request Proof of Ownership
Ask for:
- Original receipt
- Purchase documentation
- Original box (if available)
These items help establish legitimacy.
Final 15-Point Used iPhone Checklist
Before purchasing, confirm the following:
✅ Screen is free from major damage
✅ Frame is not bent
✅ Cameras work properly
✅ IMEI matches device information
✅ Device is genuine
✅ Activation Lock is disabled
✅ Find My iPhone is turned off
✅ Battery health is acceptable
✅ Genuine parts are verified
✅ Face ID or Touch ID works
✅ Speakers function correctly
✅ Microphones function correctly
✅ Charging port works
✅ Carrier lock status is confirmed
✅ Warranty and repair history reviewed
Frequently Asked Questions
What battery health is good for a used iPhone?
Generally, 85% or higher is considered a good balance between value and performance.
Is it safe to buy a used iPhone from Facebook Marketplace?
Yes, provided you verify the device thoroughly, meet in a safe public place, and avoid advance payments.
Can a blacklisted iPhone still work?
Some blacklisted devices may appear functional initially but can experience network restrictions and activation issues.
How do I know if a used iPhone is original?
Verify the serial number, test Apple’s services, confirm software updates work, and inspect the Parts and Service History section.
Conclusion
A used iPhone can be an excellent purchase when inspected carefully. However, rushing into a deal without proper checks can lead to costly problems.
By following this 15-point checklist, you can confidently evaluate battery health, authenticity, connectivity, biometric features, repair history, and ownership status before making a purchase.
Take your time, test everything, and never let a seller pressure you into skipping important checks. A few extra minutes of inspection can save you from weeks of frustration and unexpected repair costs.
Post Comment